
7. Web Accessibility Reporting
Template Audit and Audit Walk-Through
A Template Audit is perhaps the most impactful of the different types of audits that will be discussed here.
Purpose of Audit
These audits focus on the common elements throughout a website, such as the navigation, header, footer, menus, and the layout in general. They are often quick to complete, taking only a few hours, and often involve looking at only a single page. There are occasions when multiple templates might be reviewed, such as the home page, which often differs from other pages, as well as one or two unique layouts from other pages on a website.
Process of Audit
In the screenshot below you can see the areas of a page outlined. For a Template Audit, the Main Navigation, the Header (i.e,. Banner), the Side Menu, and the Footer area are reviewed. The Main Content Area would be ignored for now, to be reviewed as part of a General Audit.
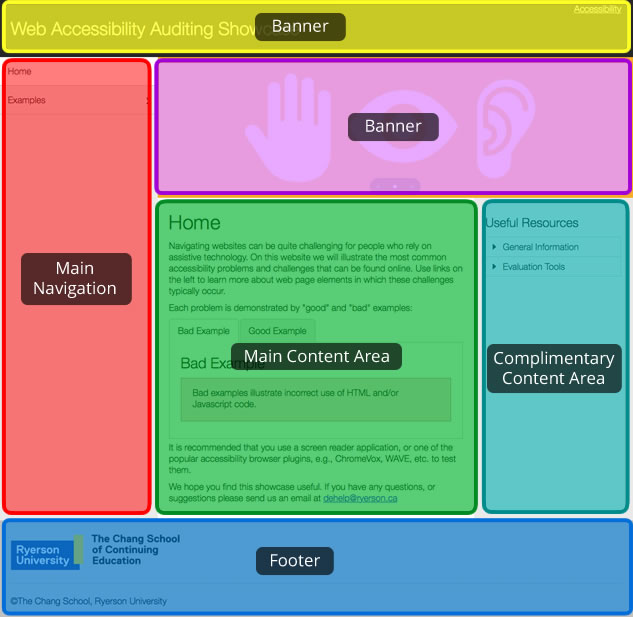
Figure: Typical template elements include the header, the side menu, banner, main content area, complementary content, and the footer
Audit Procedure
Using the sample site template displayed in the figure above, examine all the features except the main content area. The following series of tests can be followed to audit the common elements of the template. This same series of tests would be used for General and Detailed Audits as well, but rather than focusing on elements of a single page in the case of a Template Audit, these steps would be followed for each page that is being reviewed as part of an audit.
Visit the Web Accessibility Showcase to follow along while we walk through a page audit. Open the audit template so you can add notes to it as you are following along. Each of the following test strategies include a multimedia alternative to the text of the walk through.
Note regarding the following videos: The videos that appear in the section below are considered to be “media alternatives for text” and as such they do not require captions. The text itself provides the text equivalents for the videos (See Guideline 1.2.2). Nonetheless, we have captioned them here. If you encounter videos used in this way, without captions, they need not be identified in an audit report as a potential barrier, as long as they are listed as media alternatives.
Tab Key Navigation Test
Video: Tab Key Accessibility Testing
- Place the cursor in the top left corner of the page. Begin by pressing the Tab key repeatedly and following the cursor’s path through the template elements. Look for bypass links at the top of the page, and if they are not visible, look at the browser’s status bar at the bottom of the browser window to see if hidden bypass links are present. The URL displayed there should have “#content” on the end of it, or something similar prefixed with the number sign, or hash (#) as it is often referred to. Follow the bypass link(s) by pressing the enter key when they receive focus, to ensure they lead to the main content area, or in some cases to the side menu. If these bypass links are not present, look for other means to navigate through the content such as landmarks, as described in the screen reader test below or by examining the HTML markup to find them, or look for good use of headings. (Guideline 2.4.1, Level A)
- Ensure that the path the cursor takes is visible. (Guideline 2.4.7, Level AA)
- Look for access to an accessibility statement somewhere near the top of the template, and that it appears early in the Tab sequence. (Guideline 3.3.5, Level AAA)
- Ensure the menus down the left of the page open and elements in the submenus can be accessed by keyboard. This may require using the arrow keys, or they may open using the Tab key or space bar. (Guideline 2.1.1, Level A)
- Ensure there is a way to skip past the menus, particularly if they contain many items in the sub-menus. Typically the Tab key brings focus to the menu, the arrow keys are used to navigate through it, and the Tab key is pressed to exit the menu, and in this case move on to the banner area to the right. (Guideline 2.4.1, Level A)
- After the banner area, the cursor should move into the main content area. Again ensure the focus is visible through elements in the main content. Notice the tabpanels in the main content area. Ensure that it is possible to move between the tabs in the tabpanel, typically using the arrow keys, and to move directly from a tab to its associated panel, typically using the Tab key. Keyboard functionality for tabpanels may vary somewhat from site to site. (Guidelines 2.4.7, Level AA, Guideline 2.1.1, Level A, Guideline 2.4.1, Level A)
- After reaching the end of the side menu, the cursor should move into the main content area. We’ll ignore testing the elements within the main content area for now, and come back to these when we discuss General Audits. (Guideline 1.3.2, Level A)
- After tabbing through the main content area, the cursor should move to the right side complimentary content. Again ensure the focus is visible while navigating through its elements, and that the toggles used to open and close the accordion menu operate with a keypress, and that they do so without reloading the page, or without losing focus on the toggles when their state changes (e.g., open to closed). Ensure that elements in the opened submenus are keyboard operable. (Guideline 1.3.2, Level A, Guideline 2.4.7, Level AA, Guideline 3.2.2, Level A, Guideline 2.1.1, Level A)
- After passing through the complimentary content area with the Tab key, the cursor should move into the footer area. Again ensure that the focus is visible, and that functional elements, in this case links, all receive keyboard focus and operate with a keypress. (Guideline 1.3.2, Level A, Guideline 2.4.7, Level AA, Guideline 2.1.1, Level A)
- Having reached the end of the page, note whether the path the cursor took through the page was a logical path, crossing from left to right, moving from top to bottom. (Guideline 1.3.2, Level A)
- Also note whether all of the elements the focus passed through are meaningful on their own, and/or within the context of other functional elements on the page. (Guideline 2.4.9, Level AAA, Guideline 2.4.4, Level A
Using an Automated Accessibility Checker
Video: Automated Accessibility Checking
- We will use AChecker here for demonstration purposes, though you might choose to use another automated accessibility testing tool.
- Either test the page through its URL, or if the site is not publicly available, view the source of the page, typically found in the browser’s View menu, select all the markup displayed in the view source window (e.g., press Ctrl-A), copy the markup (e.g., press Ctrl-C) to the system’s clipboard, then paste the markup from the clipboard (Ctrl-V) into the Paste HTML Markup area of the accessibility checker.
- Open the Options Menu in AChecker, and select Show Source, WCAG 2.0 (Level AA), and View by Guideline. Or, adjust these options as needed. You might choose WCAG 2.0 (Level AAA), though issues identified at this level are typically optional.
- After selecting options, press the “Check It” button to run the checker, and wait for a few moments while the report is generated.
- Note the number of Known, Likely, and Potential problems the checker identifies, focusing on the Known Problems to start. Examine the Known Problems to ensure they are not false positives. You may need to follow the Line number link next to a problem to examine the surrounding markup. If the issues are actual, note them with the appropriate guideline in your developing audit report. You can also examine other information about issues by following the link next to each check that is listed in the checker’s report.
- After documenting the Known Issues in your developing audit report, switch to the Likely Problems tab in the checker, if there are any, and scan through these issues to confirm whether issues are actual or not. These issues may be actual, though often they are not, when accessible alternatives are provided. Scan through the content of the page to ensure items marked as likely have an accessible alternative. If these turn out to be actual issues, note them with the appropriate guideline in your developing audit report.
- Finally scan through the issues presented under the Potential Problems tab. These quite often are not problems at all, but because the checker is unable to identify these issues with certainty, a human has to make a decision. If these turn out to be actual problems, identify them in your developing audit report.
Markup Validation
Video: HTML Validation
- As with AChecker, submit the URL or paste a copy of the HTML source of the page into the W3C HTML Validator to assess the validity of the HTML to ensure that markup errors are not causing potential barriers. Like AChecker you can also select Options, though the default settings are typically sufficient.
- Pay attention to the errors identified in the report the validator generates, and don’t be concerned with the warnings. Pay particular attention to duplicate IDs, elements that are not closed, and elements that are incorrectly nested. These issues run the risk of confusing screen readers.
- If the page does not validate (most won’t) provide a general statement along with Guideline 4.1.1 (Level A) in your audit report that validation should be conducted to remove potential barriers that may arise when assistive technologies encounter broken markup, and provide a link to the validator. There is no need to document all the markup errors, apart from those mentioned above.
Screen Reader Scan
Video: Testing Accessibility with ChromeVox
- For screen reader testing we will use ChromeVox, turn it on then continue.
- Repeat the Tab Key Navigation test with the screen reader running, and listen carefully to what the screen reader announces. Is what you hear meaningful? Document in your audit report where additional description could be provided. Are all functional elements able to receive focus, and operate with a keypress. (Guideline 3.3.2, Level A, Guideline 2.1.1, Level A)
- List the headings on the page using the screen reader list headings command (Cvox-L-H) and use the down arrow key to cycle through the list. Are headings present, and structured in a meaningful way? Is there text that appears to be a heading but it not recognized by the screen reader (e.g., large bold fonts instead of proper headings)? Document these issues in your report if they are relevant (Guideline 1.3.1, Level A, Guideline 2.4.6, Level AA, Guideline 2.4.10, Level AAA ). If bypass links are not present, headings are provided to allow navigation through content (Guideline 2.4.1, Level A)
- List the landmarks on the page using the screen reader’s list landmarks command (Cvox-L-;) and use the down arrow key to cycle through the landmarked regions. Are all areas of the page contained within a landmarked region? Are landmarks present if bypass links or headings are not? Document these issues in your report if relevant. Suggest including them regardless of other ways to navigate through the page being present. (Guideline 2.4.1, Level A)
- List the links on the page using the screen reader’s list link command (Cvox-L-L). Are all the links meaningful in context, or not in context? (Guideline 2.4.4, Level A, Guideline 2.4.9, Level AAA)
Other Tests
Video: Check Colour Contrast
Scan the page for potential colour contrast issues. Though the page should not have any, the grey text on the grey background in the footer area appears suspicious. Determine the colour codes, using your browser’s Inspect Element feature, and run those colours through a colour contrast tester to confirm they provide sufficient contrast. (Guideline 1.4.3, Level AA, Guideline 1.4.6, Level AAA)
