
Part 2 • Class Tutorials
Tutorial 7 • Animation
Richard Adams
Animation in eBooks generally refers to vector graphics, with their small file sizes and scalability. These can add interactivity to an eBook, provided they are not overdone to the point of being distracting. Animation is most appropriate for colour eBooks (i.e., ePub and iBooks) that are designed to read on colour tablets.
eBook animations generally include three types, i.e., you want to:
- make an object, like a vehicle graphic, move when the page loads, when touched, or when a button is pressed
- make a graphic, such as an animal or object, jiggle or shake when pressed
- illustrate a complex mechanical movement, such as for a technical book

|
|
Animation Type |
|||
|
Document |
InDesign |
Hype |
jQuery |
CSS |
|
ePub FXL |
✔︎ |
N/C |
✔︎ |
✔︎ |
|
Mobi |
N/C |
N/C |
N/C |
N/C |
|
iBooks |
N/C |
✔︎ easy |
✔︎ difficult |
✔︎ difficult |
| N/C = not compatible | ||||
CSS
CSS animation is simple to implement but can only animate the object in question, like the car above. If you want to have a button start the animation or otherwise have user control, you would have to use JavaScript to connect the button with the object. For CSS animation the object must have position: absolute; or position: relative;. You can control the left and top coordinates, along with other styles like size (width, height), color, opacity, and rotation.
To make a CSS animation you will need (1) a named @keyframes rule specifying the change points in the animation as percents of the timeline, and (2) a tag, ID, or class connecting to the @keyframes rule with the “animation-name” style, “animation-duration” in seconds (s), and other styles.
Users can start a CSS animation by touching or clicking on it if the “animation-play-state” is set to “paused” by default and set to “running” using a :hover or :active pseudoselector.
|
CSS Styles for Animations |
|
|
rotate |
transform: rotate(0deg); |
|
flip horizontal |
transform: scale(-1); |
.car {

animation-name: letsgo;

animation-duration: 3s;

animation-fill-mode: forwards;

animation-iteration-count: 1;

position: absolute;

} @keyframes letsgo {

0% {left: 100px;}

100% {left: 700px;}

}
jQuery
The best way to implement user interaction in an animation is to use jQuery, an opensource library of JavaScript functions that was started by a group of MIT computer scientists. To use jQuery you have to load the jQuery library (jquery-3.3.1.min.js) and the jQuery user interface (UI, jquery-ui.js). jQuery uses the class assigned to the button and the object to link the two. jQuery is somewhat technical but is supported by ePub.
$(function() {
$(‘start’).click(function() {
$(‘car’).animate({left: ‘+=1200px’}, 1000);
});
});
In this example, we are animating the left coordinate of the “car” class by adding 1200px to the current value, which moves it off the screen, and doing the animation in 1000 microsec., or 1 sec. The animation is triggered when the user clicks the button, class ‘start.’
InDesign
InDesign animations can be created using the Window > Interactive > Buttons and > Animation panels:
|
|
|
|
1. Use the Interactive > Animation panel to animate the “car.png” graphic to “Move Right,” then adjust the distance using the green motion guide. |
2. Use the Interactive > Buttons and Forms panel to make the “Go!” shape into a button that plays the “car.png” animation. |


Tumult Hype
Tumult Hype (www.tumult.com/hype) is a vector-graphic animation program for MacOS similar to Adobe’s Flash and Animate. Hype has an easy-to-use interface and simple procedure for placing an animation into a web page or iBook. The publisher offers a fully functional demo for 14 days.
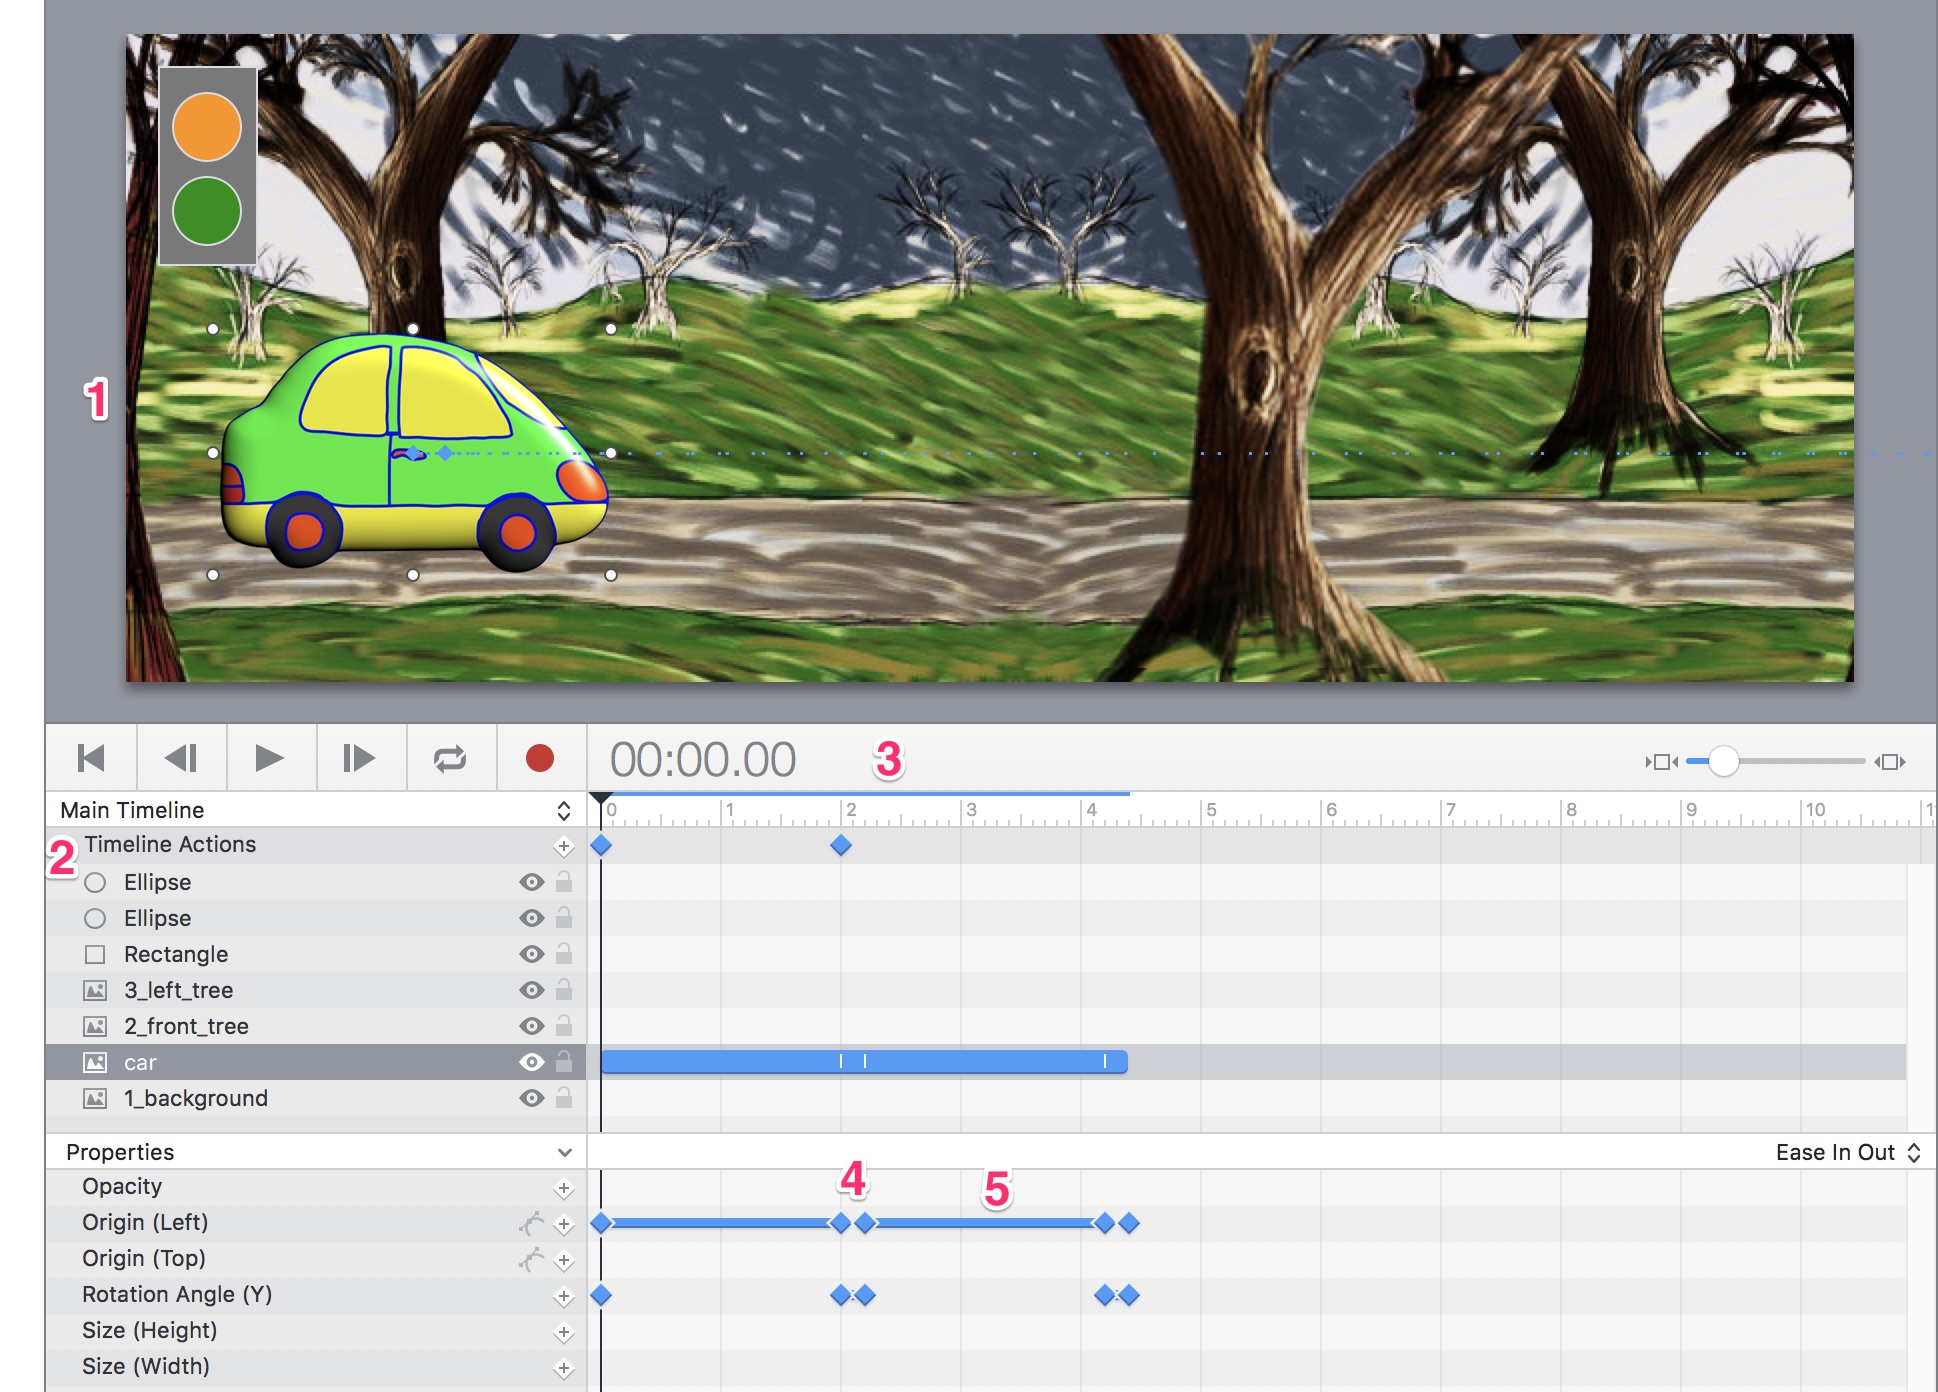
|
Components in Tumult Hype |
|
|
Component |
Function |
|
1 stage |
document or pasteboard for the animation |
|
2 layers and properties |
each object goes on a separate layer and is affected by CSS properties in the list |
|
3 timeline with playhead |
controls timing of the animation |
|
4 keyframes |
main points of change in the animation |
|
5 tweens |
transitions between keyframes |
New Document
- Make a new document in Hype. Set the stage size to the width and height of the background image (864324px).
- Drag-and-drop the background image onto the stage.
- Drag-and-drop the car image onto the “road,” size appropriately, and place at the left edge of the scene.
- With the Elements, draw a rectangle with coloured circles that will be made into buttons.
Animation
- The animation sequence in Hype is: timeline > keyframe > position. To animate the car, first select it. Put the Play Head at 00:00.00 sec. and place a Keyframe for the Origin (Left) Property at that point.
- Move the timeline to 2 sec. (or the length of time you want the car to take to get off the screen) and place another Keyframe > Origin (Left) at that time.
- Move the car to the right, off the stage.
- Play the animation in Hype to see how it works.
Buttons
- To give users control over the animation, select the green circle that you drew. In the Actions Inspector at right (hand symbol), click on On Mouse Up (Touch End) > Action > Continue Timeline.
- To keep the animation from starting by itself, bring the Play Head to the 00:00.00 position. Set Timeline Actions > Action > Pause Timeline.
- To test your animation, click the Preview button, which will open it in the browser of your choice. Check that the button works and that the animation plays as expected.
Additional Steps
- To make the car turn around at the end of the animation, add a Keyframe for Rotation Angle (Y) and set to 180°.
- Add another Timeline Action > Pause Keyframe to make the animation stop before the car turns around.
- Add more seconds to the timeline to make the car drive back to the starting point and turn around again.
- Program a second button to bring the car back.
Export Animation
A Hype animation can be placed into an Apple iBook by exporting to Apple Widget (.wdgt) format. Just drag-and-drop the .wdgt file into iBooks Author.
The animation can be placed into a fixed-layout ePub by exporting as Animated GIF, however this format offers no user control.
