Part 1 • About eBooks
Chapter 4 • Media in eBooks
Richard Adams
“Media” refers to audio, video, and animation files included in eBooks. The appropriateness and ability to include media depends on the eBook file format and anticipated viewing device and audience. Depending upon the intended audience and purpose of the eBook, media may be appropriate in the ePub format and is a strong point of iBooks. It may not be appropriate for Mobi because most B&W eReaders do not have speakers or enough storage space for large video files.
Of the various media types shown in Table 4.1:
- audio refers to sound, examples of which could include background music, a voice reading the text in a children’s book, or a clip of a musical instrument.
- video refers to moving bitmapped pictures taken with a cell phone, digital camera, or video camcorder. Videos, like pictures, represent images with microscopic pixels, or squares of light/dark and colour, which produce large files.
- animation generally refers to moving images drawn with vector graphics; that is, objects are defined by mathematical equations for points, lines, and arcs. Vector graphic animation files tend to be small because the mathematical modeling is text-based. Animation may play by itself or may include user interaction, such as buttons to start-stop-pause-rewind the scene. Vector-based animations can be exported to bitmapped formats, including animated GIF and QuickTime.
| eBook Format | Audio | Video | Animation |
| ePub from InDesign | √ | √ | √ |
| ePub from Pages | √ | √ | — |
| iBook from iBooks Author | √ | √ | √ |
| Mobi converted from ePub | — | — | √ |
Audio and Video

Any YouTube fan can attest to the explosion of digital video on the web and how it has revolutionized communication—be it for education, product information, or just sharing personal experiences. Audio and video files can be added to pages using Adobe InDesign and Apple Pages, then exported to ePub. InDesign’s Window > Buttons and Forms palette can be used to add buttons that control an audio or video file’s playback. Audio to be inserted into InDesign must be in MP3 or MP4 format. An online converter may be helpful in getting the correct file type.
Most digital cameras today can record standard-definition (SD) and high-definition (HD) videos (Table 4-2). Camera types range from cell phones to point-and-shoot, advanced amateur, and single-lens reflex (DSLR) cameras, along with amateur pocket video cams and shoulder-mounted professional models. Higher-level cameras offer more professional features, such as more control over camera settings and stereo recording from an external microphone.
| Format | Resolution (pixels) | Suggested Use |
|---|---|---|
| Standard Definition (SD) | 640 x 480 | iPad, locations where space is limited |
| High Definition (HD 720) | 1280 x 720 | small-screen TVs and standard video window on laptops |
| High Definition (HD 1080) | 1920 x 1080 | large-screen TVs and full-screen on large monitors |
Since digital video consists of a series of bitmapped images, file size limits their length and quality. A video is like a series of Photoshop images at 24–30 per second. If the length and width of the frame are doubled, then the file size quadruples. File size is a major consideration in the length and quality level of the video.
File format is another important consideration (Table 4-3). Choose a format depending upon whether your movie will be played on a Windows, Apple, or tablet computer.
| Format | File extension | Use |
|---|---|---|
| Apple QuickTime | .mov | MacOS and iOS devices |
| MP4 | .m4v, mp4 | MacOS, iOS, and Windows |
| Windows Movie Player | .wmv | Windows computers Apple computers with plugin |
Video Programs
A video editing program enables you to edit your video by doing such things as:
- deleting scenes that you don’t want
- splicing scenes you do want into a continuous sequence
- adding transitions between scenes
- adding titles
- creating special effects, such as time-lapse
- deleting sound and adding a voiceover (narration)
Apple iMovie
iMovie is an easy-to-use program for basic video editing, provides an appropriate example of a video editing program for a one-semester course in web design.
Opening a Movie
- Transfer your unedited movie from your camera to your computer.
- Open iMovie and select one of the readymade themes (or No Theme).
- Select Import Media and open your unedited movie, which will come into the Clips window.
- In iMovie, select the entire clip and move to the editing window.
Deleting Unwanted Footage
- In the editing window, place the play head where you want to cut the clip. Placing a marker (M) is a convenient way to evaluate a starting and stopping point. Then select Split Clip (B).
- After splitting the clip you can select and delete the sections you don’t want.
Adding Transitions
- From the Content Library, select Transitions.
- Find the transition you want and drag it in between two clips, or at the end of a clip. In the example, a Fade to Black transition was added to the beginning and end of the movie. The length of the transition can be set in seconds and tenths.
Adding Titles
- From the Content Library, select Titles.
- Find the title you want and drag to the location where you want it to appear—at the beginning or end of the clip, or in the middle. None of these locations add time to the movie. The title can be placed before the start or after the end of the clip, which lengthens the movie.
Lowering or Deleting Sound and Adding Voiceover
- To lower the volume in a clip, select the clip and, using the Volume Adjust control above the play window, reduce the volume 100% to the level you want. The volume can also be faded in and out by dragging the dot above the volume level line in the sound window.
- To delete sound, select the clip and then choose Modify > Detach Audio. The audio will appear below the clip as a green line. Select this line and delete.
- To add a voiceover, select the clip and move the playhead to the location where you want to start the narration.
- Choose Window > Record Voiceover. The microphone icon will appear below the play window.
- Click the start button, speak into the microphone, and click stop when finished. The narration will be added to the clip.
Exporting
- To export your edited video, click the Share button (or File > Share), then select File.
- The dialog box offers a choice of resolutions for output, along with an estimate of the file size. Note that file sizes are proportionally larger with HD-720 and HD-1080 than with SD.
Animation
Possibilities for using vector graphic animations in ePubs are summarized in Table 4.1. Vector graphic animations can be created for ePubs using InDesign, with its Buttons and Forms and Animation palettes. InDesign does not support HTML5 animations made with Tumult Hype, which is compatible with iBooks.
Animations can also be created using CSS via the @keyframes rule and associated objects. However CSS animations cannot be linked to control buttons. The animated object itself can serve as a “button” using the “:hover” and “:active” pseudoselectors along with the “animation-play-state” style.
Animations can also be created with the jQuery JavaScript library’s “animate” and “draggable” functions, and these can be tied to buttons for user control. The jQuery libraries can be imported into ePubs using an editing program like Sigil.
Animations from Tumult Hype can be exported as Apple “Widgets” (file type .wdgt), then dragged-and-dropped into iBooks Author to appear in iBooks.
| Animation type | User Interaction | eBook Formats |
| CSS @keyframes rule and connected ID/class | Hover or click states on objects (no buttons) | ePub RFL and FXL ePub from PressBooks |
| JavaScript jQuery library “animate” and “dragable” functions | Buttons, click/hover states | ePub RFL and FXL, iBook “widgets” with iAd Producer |
| Adobe InDesign (Buttons and Forms, Animation) | Buttons, click/hover states | ePub RFL and FXL |
| Tumult Hype | Buttons, click/hover states | iBooks “widgets” |
Animation in CSS
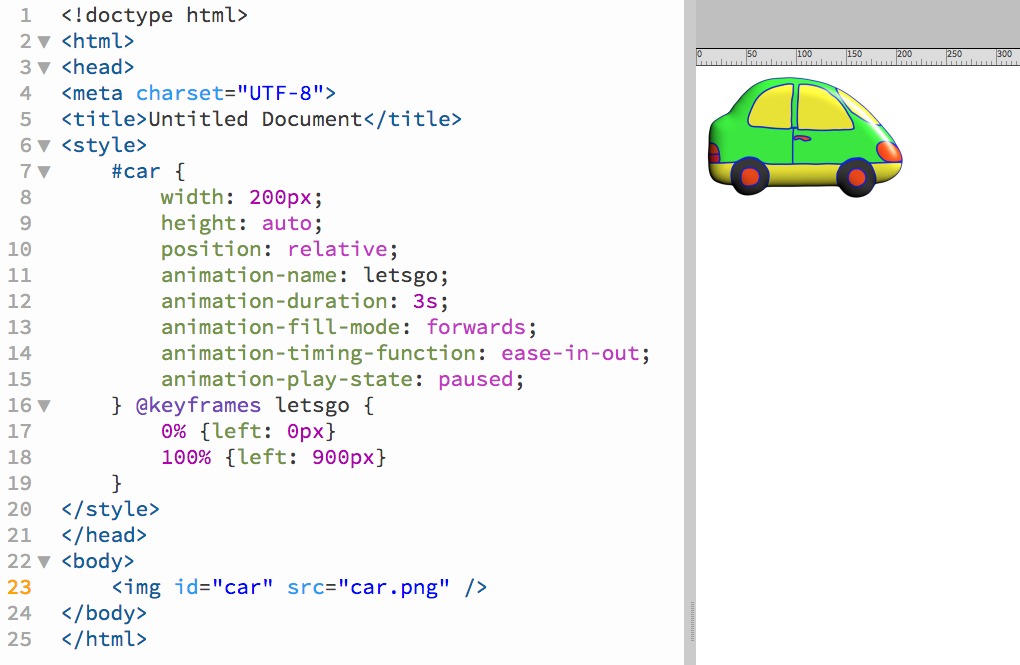
Animation with CSS can be done with a named @keyframes rule connected to an HTML tag with the “animation-name” style. The @keyframes rule specifies, using “start” and “stop” points or percentage values, the change points of the tag in the course of the animation. In Figure 4-2 a car image has been animated using an @keyframes rule named “letsgo” that is connected to the car image using the style, “animation-name: letsgo;.” Additional styles specify the “animation-duration” in seconds (“s”), “animation-fill-mode” (position upon completion, i.e., at the end or at the beginning), and “animation-timing-function” (“ease” means to start and end slowly).
The @keyframes rule specifies two keyframes, one at the start (“0%”) and one at the end (“100%”). Within the keyframes, the “left” position style is specified in pixels from the left of the browser window. For the “left” style to work, the tag must be set to “position: relative.”
The CSS animation function is documented on W3Schools site [New Window].
Animation created purely with CSS has limited user interaction/control, which could be introduced by linking the “animation-play-state” to a “:hover” or “:active” pseudoclass. To do so, the designer would write “#car:hover {animation-play-state: running;}. The animation would then start when the reader positions the mouse over (or taps) the car. Using the “:active” pseudoclass would make the car move when clicked.
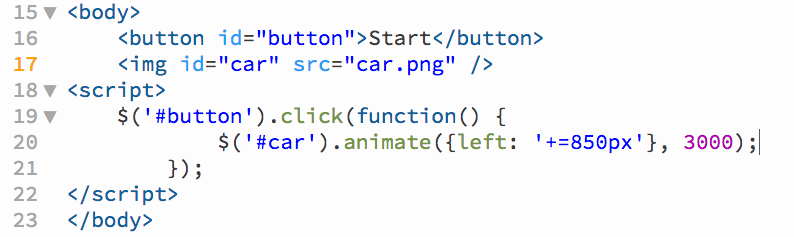
Another way to introduce user interaction into a CSS animation is to add a simple JavaScript button. The button would be written as shown in Figure 4-3. For this setup, the animation-play-state is set to “paused” and then changed to “running” with the button and code.

Animation with jQuery
jQuery is a curated library of JavaScript functions managed by the jQuery Foundation, which was started by a group of professors at the MIT Media Lab who wrote and contributed JavaScript functions to the library and offered it as an open-source resource to web and eBook developers. The jQuery code consists of a small JavaScript file that can be downloaded and hosted on the developer’s own web site, or linked-to as an external resource.
In this example (Figure 4-4), the “car” image was animated by connecting the “Start” button to the <img> tag using the jQuery “animate” function. The button was assigned an ID of “button,” while that of the car image is “car.” The animation moves the car image an additional (“+=”) 850px to the right and takes 3,000 milliseconds (3 sec.) to complete.
Animation with InDesign
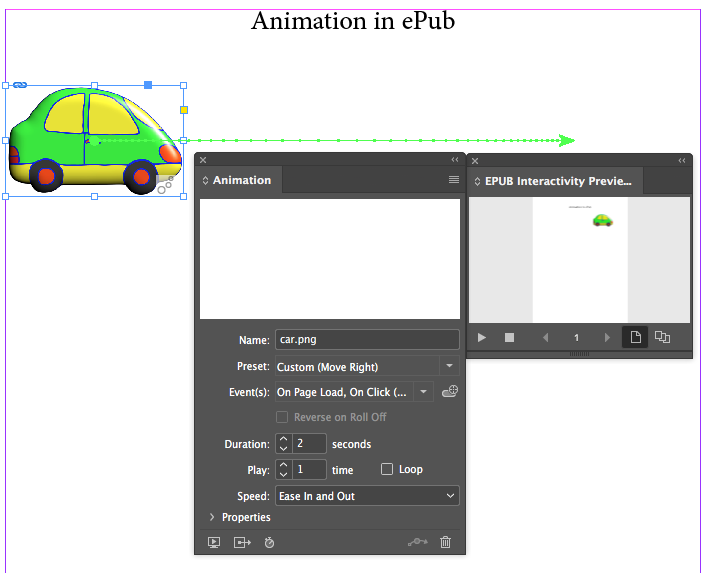
eBook creators using Adobe InDesign can create animations using InDesign’s Animation palette (Window > Interactive > Animation, Figure 4-5). After an object is placed and selected, the Animation palette can be used to assign one of numerous animation presets, along with the triggering event, duration, number of repetitions, and ease functions. The animation’s appearance can be previewed in the ePub Interactivity Preview palette (shown in Figure 4-4). Assigning a motion preset to an object gives it a motion guide (green line in the figure) that can be changed in length and curvature.
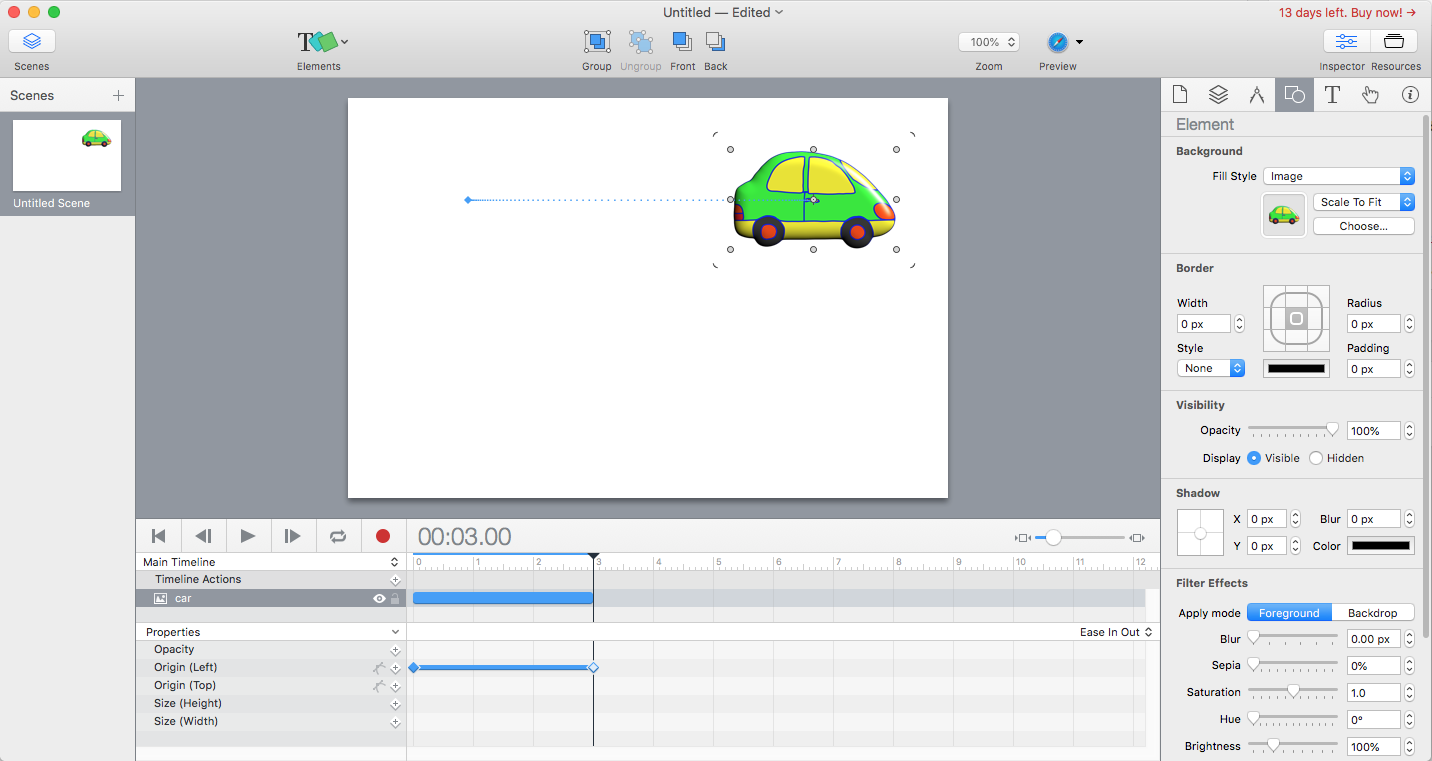
Animation with an Animation Program
Several animation programs can be used to create animations in eBooks. These offer the possibility of creating more complex animations than some users may feel up to using CSS, JavaScript, and jQuery. An inexpensive and easy-to-use HTML5-based animation program is Tumult Hype (Figure 4-6). Hype animations can be exported directly as “widgets” for drag-and-drop placement in Apple iBooks. However the company advises that it’s still working on implementation for ePubs.