Digital Photography for Graphic Communications
Chapter 8 • Photoshop
Introduced in 1989, Photoshop is a market-leading image editing program that is useful in web design for opening, formatting, editing, and saving images for the web.
Image Capture
The best way to capture high-quality images for the web is with a digital single-lens reflex (DSLR) camera, whether mirrored or mirrorless. Today’s semi-professional and advanced amateur cameras typically capture 20–36 megapixels (MP), and the megapixel capacity increases as new cameras are introduced every year.
Camera raw format captures the full megapixel and density range of the camera, however such large images are seldom necessary for the web. in fact, they can be detrimental to loading times. Camera Raw includes both proprietary formats for each camera manufacturer and model, as well as the universal digital negative (DNG) format.
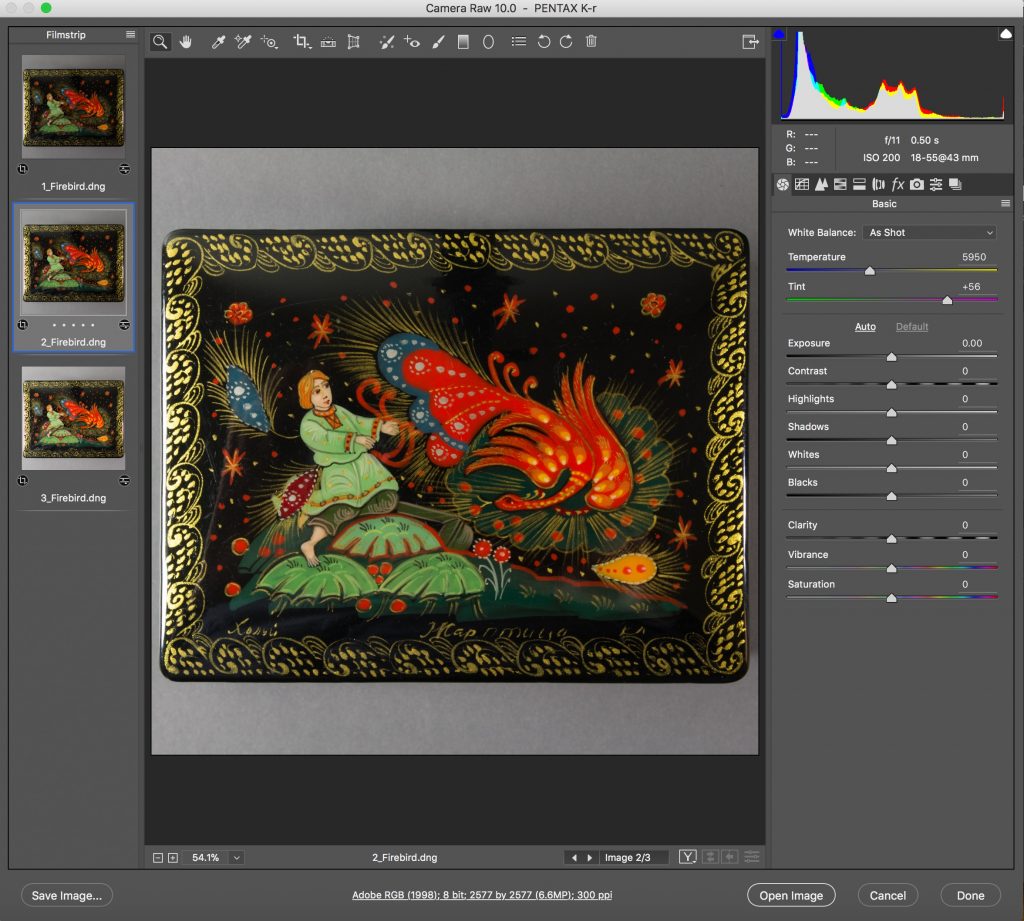
When opening camera raw format in Photoshop’s Camera Raw plugin (Figure 8-1), web designers should think about the maximum image size they will need, then use the image resizing feature to get the desired size. The site websitedimensions.com says that 35% of web surfers use a browser window that’s 1366×768 px, while 20% use 1920×1080. If this is true then the maximum size window would be 2 MP (1920×1080) and a full-size image would not need to be larger than that. It may be useful for the designer to think about the anticipated maximum size of an image as being a full-page, half-page, or quarter-page image. A quarter-page image would need to be 960×540 or 0.5 MP.
| Suggested Photoshop Workflow for Web |
| 1. Set camera exposure, white balance, and depth of field for optimum photo.
2. Record in camera raw format, bracketing exposures 3. Open photos in Camera Raw plugin, select correct exposure, set image size, and open 4. Edit as required 5. Export to JPG or PNG using Export > Save for Web. |
“Toning” Images
If you have a bracketed series of exposures, several features of Photoshop are useful for choosing the best image and preparing it for publication.
Obviously it’s easier to see the quality of a photo on a large-screen computer monitor than on a camera’s 3-inch display. However Photoshop and other programs also allow you to compare photos “by the numbers” by reading highlight and shadow values.
The lithographic printing industry took a systematic approach to image toning, based on the largest and smallest halftone dots that a press can typically reduce. Measured on a scale of 0–100% dot area, most presses can reproduce 3% highlight dot and a 97% shadow dot.
For images on the Web, monitors display color on a scale of 0–255 levels, where level 0 is black and 255 is white. Applying the 3-97% minimum-maximum to the levels scale: 3% of 255 is 7.65, or 8 when rounded; while 97% of 255 is 247.35, or 247 (Table 8-1).
| Table 16-1. Highlight and Shadow Dot Values | ||
| Highlight | Shadow | |
| % Dot Area for Print | 3% | 97% |
| Levels for Web | 247 | 8 |
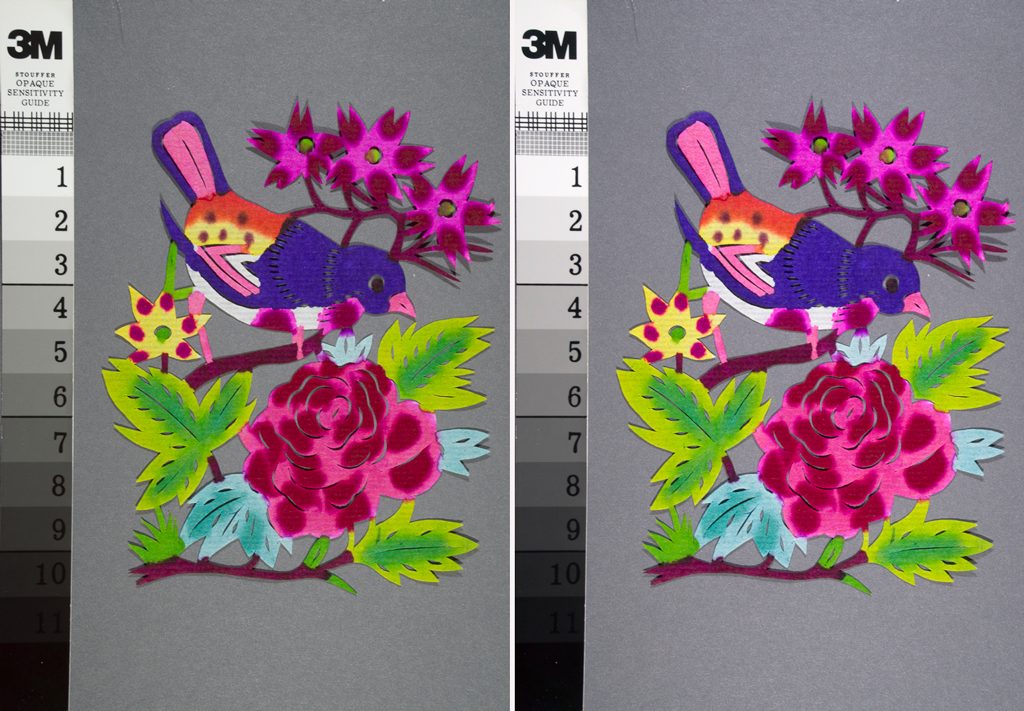
To select the best exposure from a bracketed series, make sure the file has no levels above 247 or below 8. After selecting the best image from a bracketed series, you can further “tone” the image (Figure 8-2) by adjusting highlight, shadow, midtone, gray balance, and color.
Making Transparent PNG Files
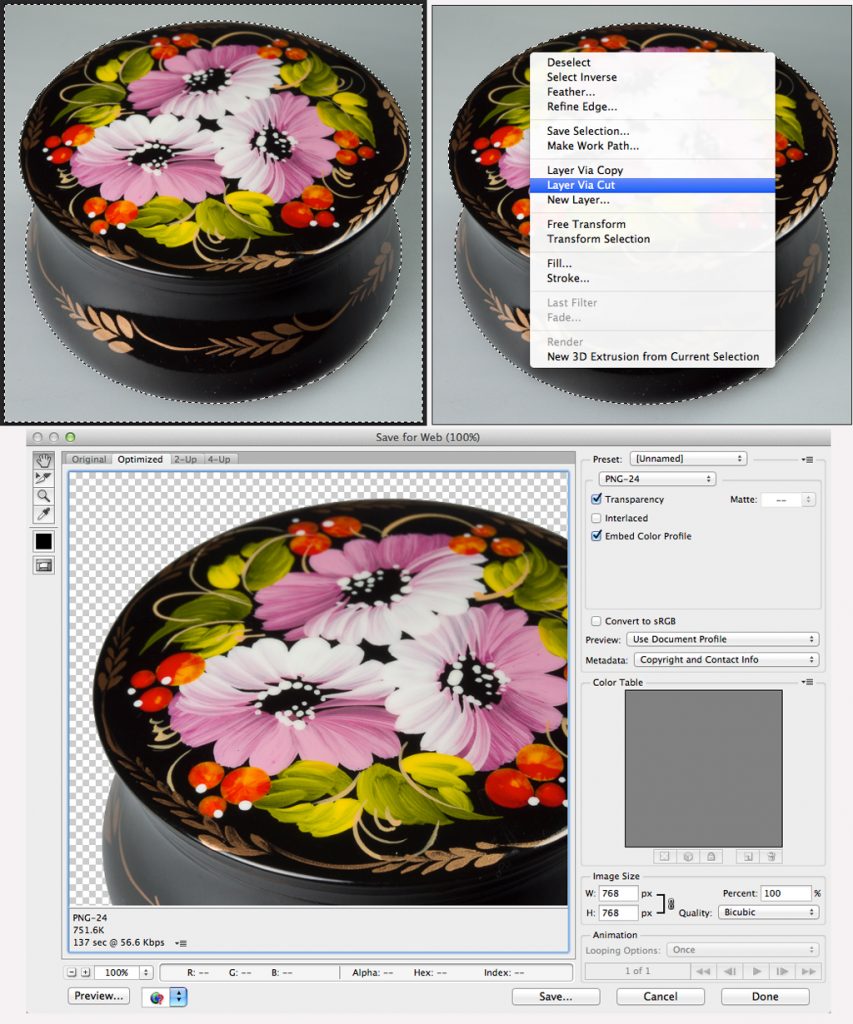
If your image contains one or a group of subjects that you want to publish on the Web without the background, save the image as a PNG file with transparent background (Figure 8-3).
First, make a selection path around the object(s) you want to isolate from the background. Then right-click on the selected subjects and choose “New Layer from Cut.” Select the background layer and set its transparency to 0%. Save for Web in Photoshop, check the Transparency option, and verify in the preview.
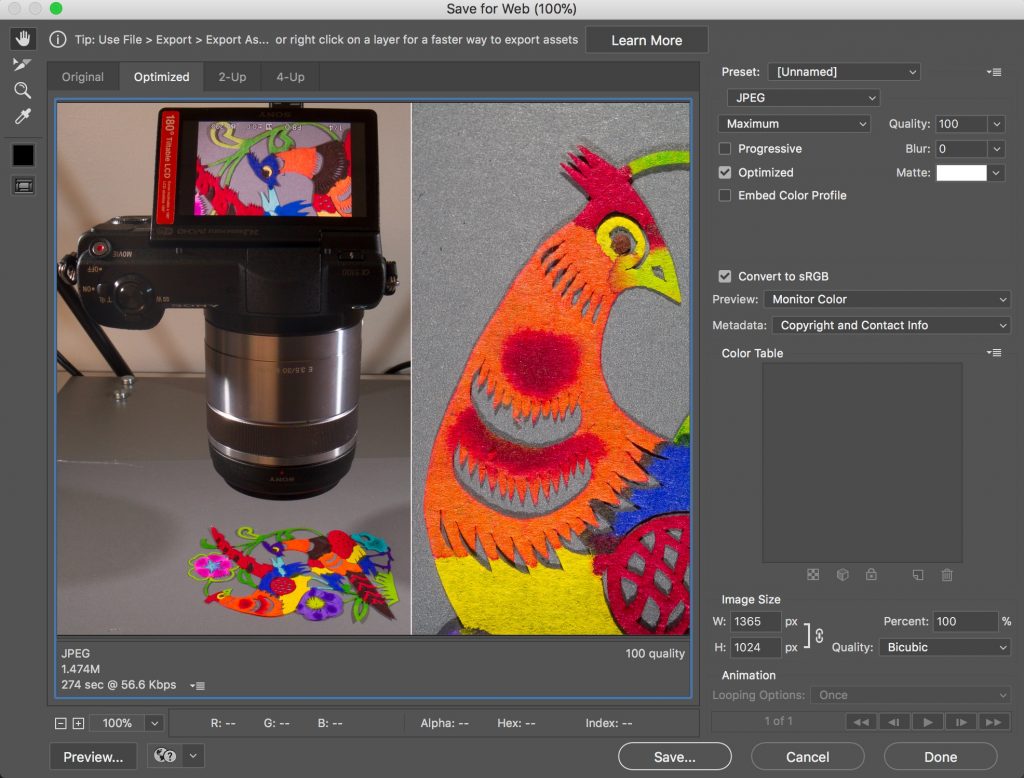
Saving Images for Web
Once an image has been opened and edited in Photoshop, it can then be saved in a format suitable for web (JPG for photos and PNG when transparency is required) using the Export > Save for Web feature. This dialog box (Figure 8-4) includes settings for image format, transparency, size, and resolution.
Non-Destructive Editing
As a bitmap image-editing program, Photoshop enables users to change the tone and colour, along with the pixel content, of images. This is known as destructive editing because the original characteristics are altered.
Non-destructive editing is done through layers and masks and preserves the original pixel information. There are three reasons why non-destructive editing is useful:
- Preserving the original. Since non-destructive editing preservers the original pixels, you can always go back to the original image if you don’t like the results of your edit.
- Making a record. Non-destructive edits provide a step-by-step record of changes, so that you can later go back to them. This could be useful when editing for a client, to show what edits were made and justify the time spent making them.
- Working faster. Editing via layers and masks allows you to organize your edits, see what you are doing, and work faster and more efficiently.
Tools for Non-Destructive Editing
Layers. A fundamental concept of non-destructive editing is to apply edits to Photoshop Layers. Adding a layer is like placing a clear plastic overlay on top of a photographic print, and making the edits on the plastic. The effects of the edit layer can be applied to the layer(s) below, then turned on and off to visualize the photo with and without the edits.
Layer Masks. A Layer Mask accompanies a Layer and can hide or show part or all of the effects of the Layer.
Adjustment Layers. This type of Layer applies Image > Adjustment effects, such as Brightness/Contrast, Levels, Curves, and others, via a Layer, so that changes are non-destructive.
Layer Styles. A Layer Style adds effects to another layer, such as a drop shadow, emboss effect, gradient, or other effect.
Smart Objects. These include placed images and image components whose original pixel data is preserved after edits. Let’s say you place a logo or other image into an existing image and then want to reduce its size. If first converted to a Smart Object, Photoshop will retain all the pixels in the original logo so that it could be enlarged later.
Smart Filters. These are Filters applied to Smart Objects so the effects of the filter can later be removed or modified.
Content Awareness. A form of artificial intelligence, content awareness examines neighbouring pixels and uses them to fill in spaces, move objects, and resize images.
Tips for Non-Destructive Editing
- Duplicate a Layer. Let’s say you open a digital photo in Photoshop and want to make some edits. The fastest way to edit non-destructively is to duplicate the Background Layer into which the photo is opened. Simply drag the layer to the New Layer icon in the Layers palette to duplicate it. Or select the layer and choose Duplicate Layer from the Layers menu or the upper-right popup menu in the Layers palette.
- Retouch through a Layer. When retouching defects, artifacts, or undesirable features of an image, the Clone Stamp, Healing Brush, and Spot Healing Brush tools can be applied through a Layer (Table 8-3). Simply check “Sample All Layers” or choose “Current and Below” from the popup in the Properties menu. (Not all tools work through layers, see Table 8-4. In this case, duplicate the layer before retouching it.)
| Table 8-2. Retouching Tools that Work through Layers |
| Clone Stamp Tool
Healing Brush Tool Spot Healing Brush Tool |
| Table 8-3. Retouching Tools that Don’t Work through Layers (duplicate layer first) |
| Content-Aware Fill
Content-Aware Move Content-Aware Scale |
- Use an Adjustment Layer to Change Tone or Colour. To improve contrast, brightness, highlight, shadow, gray balance, selective colour correction, and other adjustments, apply an Adjustment Layer to make these changes non-destructive.
- Apply a Layer Effect. Layer Effects make it easy to add a colour blend, metallic effect, drop shadow, and many others in a non-destructive manner.
- Use a Layer Mask. A Layer Mask hides, shows, or alters the appearance of its associated layer. Example: If you apply a colour fill to a layer, the colour can be selectively applied using a Layer Mask. Painting or filling with black negates the effect of the associated layer, while painting with white or the Eraser Tool reestablishes the effect.
- Use a Smart Layer for Filters. Photoshop features dozens of filters that can add noise, sharpen, smooth, and otherwise alter the appearance of images. Applying them as Smart Filters to a Smart Object preserves the original appearance of the object or layer.
| Table 8-4. Layer Types in Photoshop |
| 1. Layer
2. Layer Mask 3. Layer Effect 4. Adjustment Layer 5. Overlay |
- Place Smart Objects for Resizing. When another file, such as a logo, is placed into an existing file as a Smart Object and resized, Photoshop retains all the pixels in the original. This enables the size to be readjusted without loss of information.
- Use Content-Aware Scale to Resize. One of several content-aware features, Content-Aware Scale uses artificial intelligence to resize images while retaining the original scene objects.
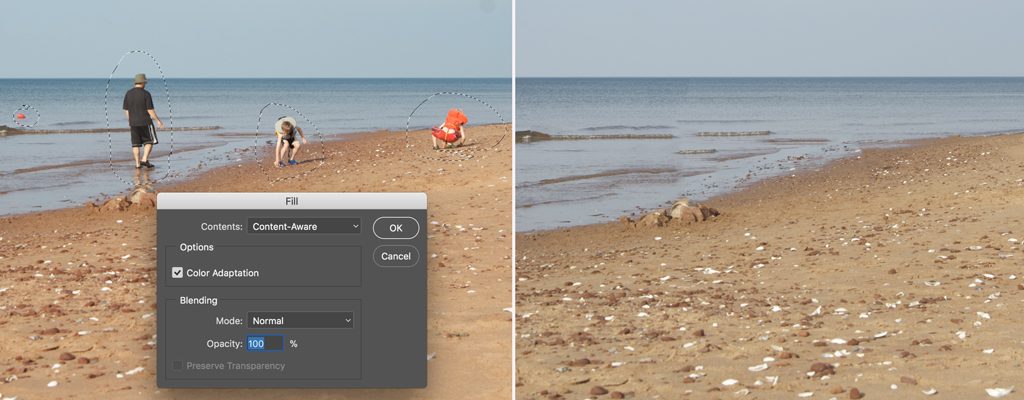
- Use Content-Aware Fill to Remove. This feature is useful for removing objects from scenes, such as people on a beach. Select the object(s) with one of the selection tools, then apply Edit > Fill > Content-Aware.
- Use Content-Aware Move to Move. If you want to relocate an object instead of deleting it, the Content-Aware Move tool examines surrounding pixels near the source and destination to make the moved object(s) blend in with the new background.