
5 Chapter 5: Sound for 360 Video
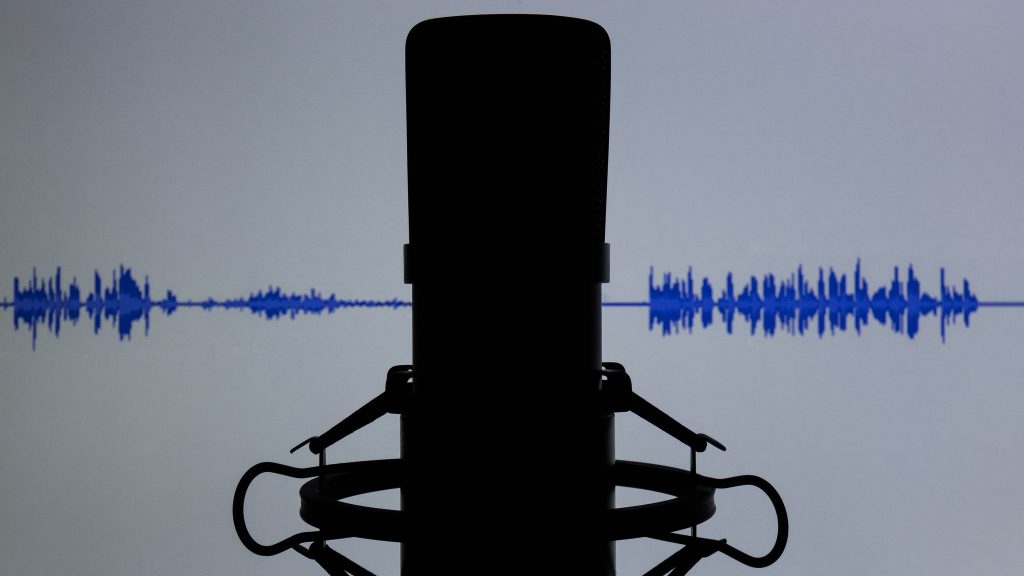
Sound can distract us or take us out of a moment. Poorly recorded, distorted, muffled sound is unpleasant for the ear and can ruin an otherwise great video experience. When the visuals don’t match what we’re hearing, it can be confusing. For 360 video, sound may be an even more important consideration than for other types of visual mediums because of the high level of presence we’re trying to generate. When the sound is recorded and produced well, your 360 audio content can go a long way to pulling your viewer in. Here we offer you some suggestions on achieving great sound for your projects.
The different types of audio formats
Without getting too technical for a beginner’s guide, when discussing audio, we’re usually referring to the five most common ways to record and listen to sound playback. There’s mono sound, which is recorded with one microphone and gives you one channel of audio (hence the use of term “mono,” which is Greek word for “alone” or “single”) You’re probably pretty familiar with stereo sound, which is recorded by spacing two microphones apart onto two channels (left ear and right ear). This is the most widely used format in the modern era.
Then, there’s a special kind of stereo recording called binaural audio. Like stereo, this is made by using two microphones, but the microphones are positioned on a dummy or a special configuration to better mimic how human ears are positioned. This helps to recreate the natural way we experience sound, with certain sounds registering at different volumes depending on their position of origin. The differences in binaural sound can be heard while using headphones and sounds more dynamic and realistic. This is where we start to get into the realm of “3D sound,” which has become something of an umbrella term for several immersive recording formats, including binaural.
The BBC has a video on YouTube that demonstrates how binaural sound works:
There’s also surround sound, which is most commonly available in the 5.1 format, but other formats exist, including 7.1 and Dolby Atmos. This type of sound works by recording with multiple microphones on several channels and then playing back each audio element through a different speaker. A 5.1 surround system, for example, would generally involve positioning six speakers (including a subwoofer) around the listener, like in movie theatres or scaled down home cinema setups. A 7.1 system connects with eight speakers. Increasingly, high end headphones are incorporating surround sound technology with several distinct speakers embedded into the speaker cups.
And finally, there are ambisonics, which utilize at least four microphones arranged in a tetrahedral configuration to record on multiple channels of audio. The key difference between ambisonics and surround sound is that the audio signals in surround sound are sent to distinct, designated speakers, whereas ambisonic audio signals are not preset to any particular output. This helps to create a smooth, continuous, enveloping sphere of sound that changes as you move and rotate your head. The Berklee College of Music has a pretty cool video explaining some of the science behind ambisonic recording:
It’s considered more of a truly three-dimensional sonic experience because you can hear sounds above and below you, not just front and behind. The sound also shifts as you move your head position. Comparatively, normal stereo and even binaural recordings may sound great, but it will remain locked in position and not change as you turn your head around, which matters far more when you want to optimize your 360 video experience.
Many of the higher end 360 cameras, like the Insta360 Pro series or the Ricoh Theta V, do have binaural or ambisonic audio recording capabilities built-in to the device. However, most of the entry-level 360 action camera models feature only stereo microphones. It’s a more expensive and complicated feature that has yet to be incorporated as a universal requirement for 360 cameras (although we expect it soon will, much like 4K resolution).
There are, however, several ways for you to record surround sound for your 360 videos without having this kind of audio tech built-in to your camera.
RECORDING “3D” AUDIO FOR 360
If you truly wish to have a “3D” effect for your audio (and you have some cash left to spend), the most straightforward solution is to purchase a recording device specifically intended for 360. There are several options depending on your price point.
On the more affordable end of the cost scale, the Zoom H2n Handy Recorder is a very popular option among 360 filmmakers on a tight budget who want to take their sound up a level. It’ll run you a little more than $200 CAD, but offers five integrated microphones and several recording modes, including 2 and 4-channel surround sound. It’s compact and portable and ideal for taking out on the road.
Zoom also sells the H3-VR Handy Recorder that was specifically designed to capture sound binaural or ambisonic sound for 360 video. It features a four-way ambisonic microphone setup that automatically decodes your sound files for quick transfer and use for your 360/VR videos. This will currently run you about $500 CAD. The additional features of being able to livestream 3D audio and convert your sound files to 5.1 surround sound make this a particularly versatile microphone at a relatively affordable price.
3Dio is a binaural audio recording company that makes a whole line of microphones for hobbyists and professionals-alike. The company’s devices feature two microphones tucked within two plastic ears, which really help you visualize what the listener is hearing during recording. Its line of Free Space microphones are solid choices for the intermediate 360 filmmaker, offering high quality binaural recording for under $800 CAD.
On the higher end of the 3D audio spectrum, Rode’s SoundField NT-SF1 ambisonic microphone is a professional-level device that’ll cost around $1,300 CAD. It’s a sturdy, well-constructed and powerful microphone that captures crystal clear, cinematic quality sound.
So is there a clear winner among these different choices for 360 sound? It can really depend. For basic level 360 video, where a good portion of viewers may be watching on a computer and listening through desk speakers, a combination of carefully captured camera audio (perhaps reinforced by audio recorded through a separate external sound recorder) can get the job done. At the moment, many of the most popular 360 videos on platforms like YouTube and Facebook don’t feature 3D audio (although this is likely to change with the rapid improvements to devices and softwares). In which case, we can offer some straightforward and simple tips to help you record the best audio you can without any other special equipment (see below).
If your interest is pursuing more professional-level 360 video content or potentially gaming experiences, then expanding into binaural audio, surround sound and ambisonic recording will be important. Some audio technicians believe that binaural audio is inferior to ambisonic sound because a true 6DoF virtual reality experience should have the sound rotate with the viewer. Others feel that binaural is just fine, especially for 3DoF experiences where the user has a fixed position anyways. For this reason, the Zoom N3-VR Handy Recorder could be a solid compromise, giving you the ability to record multiple formats of 3D sound without breaking the bank too much.
Tips on recording with your spatial audio device
If you end up using a spatial audio device, follow the instructions and recommendations from the manufacturer on how to best use it. But there are a few suggestions we have to help you get the most even, clean audio you can for your 360 video.
In general, you want to place your recorder as close to your 360 camera as possible. Remember, if the camera can be thought of as representing what the viewer sees, then the audio recorder can represent their ears.
Many filmmakers like to rig their audio recorder to the monopod so that it can sit above or below 360 camera. This is often done by attaching a small camera clamp (sometimes called a nanoclamp) with a threaded head onto the monopod. This works particularly well with larger professional cameras like the Kandau Obsidian or Insta360 Pro series, where the recorder has a better chance of remaining in the blindspot. With thinner cameras, you’ll have to experiment more with how you position your spatial device to see if you can hide it from view. As well, be sure to make sure your audio recorder isn’t actually touching the monopod or 360 camera or anything else, as this would assuredly block some of the sound capture and perhaps cause unwanted reverb effects.
Another common solution is to attach the spatial device to its own monopod and then situtate it below your camera. This can take some messing about, but the key thing is to, again, try to position your device so that it a) close to the camera to capture that “natural” way the audience would hear the sound and b) to keep out of the camera’s view. If another monopod isn’t available, some producers will sit the microphone at the bottom of the camera setup, however being able to elevate the device somehow will improve the recording immensely. Remember that objects can be masked or blurred out in post-production video editing programs like Premiere Pro, but we want to minimize this if we can.
As 360 cameras can be positioned in numerous ways, it’s important to make sure your audio is being recorded in a way that matches the direction of the filming. Josh Gonsalves, a producer, director, 360 filmmaker and co-founder of VR company Contraverse has this advice:
“Make sure you’re pointing your camera in the right direction. Meaning, you need to know where true north is, so that it will match up with your spatial audio. You want to point the camera in the right direction, in the middle of the room, so the audience can see the whole thing. Many of these cameras have a viewfinder, so use that to find out where the centre is, and match up the audio recorder with that.”
Once you’ve captured your spatial audio, you can work with it much the same way you would with stereo audio files in a digital audio workstation (DAW) or video editing program., but you’ll most likely have to make some adjustments in a spatial audio studio software prior to that. Spatial audio editing could be an entire other guidebook and as this is a beginners’ guide, we won’t dive into specific editing techniques. But there are some excellent spatial audio programs one can use supported by plenty of freely available resources and tutorials. Please check our Additional Resources section for some suggestions.
Tips on getting clean audio for your 360 video with your camera’s built-in microphone
While spatial audio is exciting, powerful and highly recommended for anyone producing cinematic or professional 360/VR content, the typical 360 creator should be more concerned with maximizing the stereo sound built-in to most consumer-level 360 cameras. And even if all you can work with is stereo, there are still techniques you can employ using standard audio recording equipment to help bolster your 360 video’s sound. It may not be 3D, but striving to create a quality sonic experience for your content will really help its immersive qualities.
As discussed elsewhere in this textbook is the idea that 360 technology works great for certain types of storytelling. Audio production is similar in that you should look (and listen) for good audio. A busy intersection, a morning with birds chirping, or a roaring river, all offer the possibility of not only good images for 360 but also great sound as well. When you are considering your story, don’t forget the sound as it can add so much to the experience. As a side note, having great sound also gives you the option to tell your story in podcast form using the sounds you collected.
- Close your eyes and listen to your surroundings. Before you start recording it is a good idea to focus on the sound around you. Closing your eyes and listening is where this starts. Be aware of the sound. What do you hear when you just listen? Wearing a headset when you do this is also a great way to “listen as the camera listens”. Are there noises you don’t want or that will be distracting?
- Eliminate Unwanted Sounds. As you listen you might hear sounds that are unwanted and in some cases you might be able to minimize or eliminate them altogether. Maybe you are in a room doing an interview and there is a window open so you hear unwanted street noises. Close the window. Or there might be a radio on with music playing. It is better to turn off that music (much easier to edit as well there is no potential copyright infringement). Or maybe there is a computer on with a loud fan. By listening to the room you can maximize the quality of your sound recordings. You might be tempted to “fix it in editing” but be aware that removing unwanted later on can be difficult or impossible, so do the best at the time of recording to only get the sounds you want.
- Be Quiet When Recording. When you are recording you will need to make sure that you are silent. Yes, when you are shooting 360 you should be far enough away to be “out of the shot,” or at least not prominent, but voices carry. Make sure everyone on your crew is also quiet. Let the sound of your surroundings be what is recorded. When recording interviews, with the exception of asking questions, the interviewer must be quiet when the subject is answering the question. In traditional interviewing it is annoying, but in 360 the person listening might take it as a false cue to turn and look at the interviewer.
- Record extra ambient sound from your location. Always record much more sound than you think you need as this could be very useful in editing. Record at least one minute of ambient sound. Again, this is something that is useful in editing. You want to sound to match the pictures though, so make sure you also record good visuals at the same time.
- Do a Sound Check. Record a snippet of audio and then play it back to see whether the sound is coming back clear and clean. This will allow you to catch any unexpected issues and make adjustments.
- Use headphones (if possible!). If you only have earbud type headphones, then cup your hands and put them over your ears to try to better insulate the sound. Professional over the ear headphones are better.
- Use an external stereo microphone. This leads us to our most important suggestion in this chapter: using some kind of external stereo microphone. This is a good compromise between diving into spatial audio recording and just using the built-in camera microphone and we highly recommend this if you’re unable to get your hands on a binaural or ambisonic microphone. Here are some of the reasons why you should use an external microphone:
-
- Using an external microphone will almost always give you much better sound. Yes, this will mean more expense in buying another piece of technology, but a good mic will be good for years. It is money well spent.
- External microphones allow you to put the microphone closer to the sound source. This generally means a stronger, clearer sound (remember, some distance between the subject and 360 camera is required to prevent distortion and blurriness). If a microphone is further away, it will sound more hollow and other environmental noises will be mixed in as well.
- Usually external microphones are better quality than the ones manufacturers build into their cameras. Many external microphones are made by companies that only make microphones, and who specialize in audio pickup technology. A good quality microphone is worth every penny.
- An external microphones allow you to pick the right mic for the situation you are recording. Sound recording is like carpentry – just as you need different tools for different tasks, so too you will need different mics for different scenarios. For example, an interview situation works best with a tie clip (also known as a lavalier or lav mic) because it puts the mic on the subject close to their mouth. A concert recording, for example, would require a different type of microphone. Having a variety of microphones will serve you well in your 360 productions.
- It gives you more ability to create immersive video experiences. Generally the microphones built into 360 cameras record the sound in every direction and, if it’s stereo recording, the audio will be locked in and won’t reflect shifts in environmental sounds as you rotate your head. As mentioned, an external audio recorder will allow you to get great sounds of interviews or specific ambient sound (traffic, a river sound, the sound of a crowd) but if it is not binaural or ambisonic sound, you are not getting the full 360 audio effect. For example, if you’re shooting a 360 video of a park and there is a great fountain nearby, you could grab an isolated clip of that water sound. If your video’s starting orientation has this water sculpture on the left hand side, you can then add the water sound clip as an additional audio track with an emphasis on panning it left. You can do this with other sonic elements in the scene. This is most definitely not 3D as the sounds won’t actually track with how you rotate your head, but it can be a way to build a more robust soundscape for your video.
-
External stereo recording device options:
- There are numerous options for a portable audio recorder, with some being fairly inexpensive. Particularly with 360 video, we would suggest looking for a solid yet slim device, in order to give you more ability to tuck it under the camera and out of the video. Recorders like Tascam’s DR-05 and Zoom’s H1n models fit this bill and are reasonably priced.
- If you’re looking to move a step up, then we suggest the previously mentioned Zoom H2n will give you more flexibility (such as binaural audio and surround sound recording) for about $50 more.
- If you’re not in the market for a seperate portable recording device for audio, IK Multimedia manufactures several audio recording products in their “iRig” line that allow you to easily record directly into your smartphone, including microphones and battery-powered XLR adapters using the headphone jack (for those of you with headphone jackless iPhones, a lighting rod adapter can be used). The iRig products are compatible with pretty much any smartphone and any mobile audio recording apps (we’ll offer you a few suggestions in our Resources page), making them versatile, user-friendly and cost-effective options.
- As we mentioned in the previous section about spatial audio devices, there are ways you can try to “hide” the recording devices below the 360 camera so it doesn’t show up in the shot
External microphones
If you end up purchasing an iRig XLR adapter, it’s good to know a little bit about XLR microphones. In general, XLR (which stands for External Line Return, in case you’re wondering) microphones have been the go-to standard for professional audio recording. You’ll probably recognize the familiar three-pin design of the connector. In terms of microphones, there are two primary types that are common for audio recording – dynamic and condenser microphones.
Having the ability to plug in an XLR connector means you have access to a wider range of pro level microphones. You might consider looking at used pro mics as well as these are cheaper and often well maintained.
Please note that different microphones offer different pick up patterns. In other words, some are great for picking up sound further away and some are more effective capturing sounds that are closer to the microphone. In traditional video production you will use different microphones for different situations. Even though 360 audio recording is different because you are trying to get immersive sound, it is helpful to understand the different kinds of microphones types.
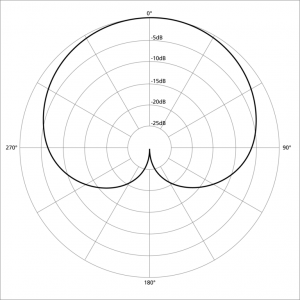
A cardioid microphone is a directional microphone that has a heart shaped pickup pattern. This means the microphone is most sensitive in front. This microphone is good for street interviews but, due to the sound pickup pattern, it will mean you will have to move the mic back and forth if you want to record the reporter. Not all cardioid microphones have exactly the same pickup pattern but generally they look like this:
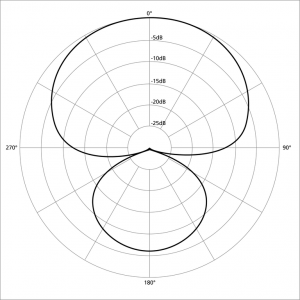
If you are trying to record in a very loud environment, like a football game, you will probably want an even more directional microphone. In this case you will want to use a hypercardioid mic, which is sometimes called a supercardioid. Due to the look of the microphone it is commonly referred to as a shotgun microphone. These mics have vents down the side of the mic which act to cancel sound coming from the side. Typically, the more vents you have the more directional the mic is (and the longer). An example of this pickup pattern is this:
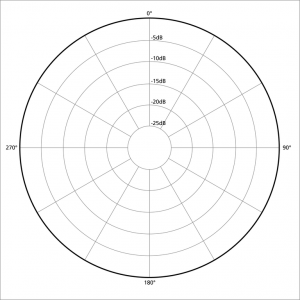
If you are looking for a microphone to record a wider range, there is the omnidirectional microphone. Now, to be clear, a traditional omni directional microphone picks up sound in a 360 degree pickup pattern, but it mixes all of those sounds together so you will not get a 360 sound effect. It does however do a good job recording all the sounds around it. This is good for recording the ambient noise in a scene. The pickup patterns looks like this:
Another thing you should be aware of when picking a microphone is that some are condenser mics and some are dynamic mics. A dynamic microphone does better when capturing louder sounds, like live music or an airshow. It also DOES NOT require power. A condenser mic is better for capturing higher frequency sound and sounds that are more gentle sounds that you would find in a controlled audio space. It also REQUIRES power in order to work.
A microphone that is very popular for use during interviews has traditionally been the lavalier (or lav) microphone. This is a small clip-on mic that can be attached to your subject. If you use one, try to get it as high as you can on the subject’s chest and aimed towards their mouth. Attaching a lav mic is very simple and should be done by the subject. Make sure if you use a lav mic to hide any cords. For 360 video it is recommended that you use a wireless lav mic system.
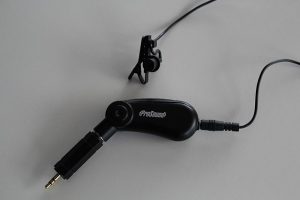
The advantage of the lavalier mic is that you are putting a mic about (ideally) 15 centimeters (roughly six inches) from the subject’s mouth. This should give you excellent sound. Again, do not underestimate the importance of great sound. If the interview sounds hollow and hard to hear because of room noise, you will not be able to do much later in editing. Get it right the first time. Any time you do an interview you must check your recording periodically. Start with a test recording and then again at the end. Did it record? If it did not, hopefully there is still time to re-ask at least some of the questions.
Connectors
It is also helpful to know some different audio connectors. XLR cables are the most popular professional level connector. They are a locking connector, meaning in order to remove the cable you must push a release button on the cable. This locking feature allows for a more secure connection between the microphone and the camera but be careful not to trip on the cable as it could pull the camera over. As mentioned, only a few mid range 360 cameras have a mic in and none of them use XLR connectors. You would need an external device like a Beachtek XLR adapter. Also, if you are using an external audio recorder, some of these are sold with XLR inputs.
Below are also some other audio connectors you might encounter:

Sound has been called the forgotten child of television and it is important to remember that. Great 360 storytelling is not just the visuals but also the sounds that existed in that space.
TL;DR
- Capturing ambisonic or binaural audio can really elevate the immersive quality of your 360 video.
- You can still achieve good sound using your camera’s built-in microphone, but we always recommend using an external recording device whenever possible, even if the device only records basic stereo audio.
- If you’re use an external recording device, experiment with ways to hide the device in the 360 camera’s blind spots or somewhere in the scene.
